
This blog post series is based on a proof of concept to demonstrate how easy it is to connect SAP Application Servers to a Network Load Balancer, which also has a connection to an AWS Auto Scaling Group to use the elastic feature of the cloud. With the help of this architecture, it is possible to scale in and out based on scaling policies in multiple availability zones (AZ). In this part we will set up the SAP Backend and optimize it with a custom script, which will do the trick.
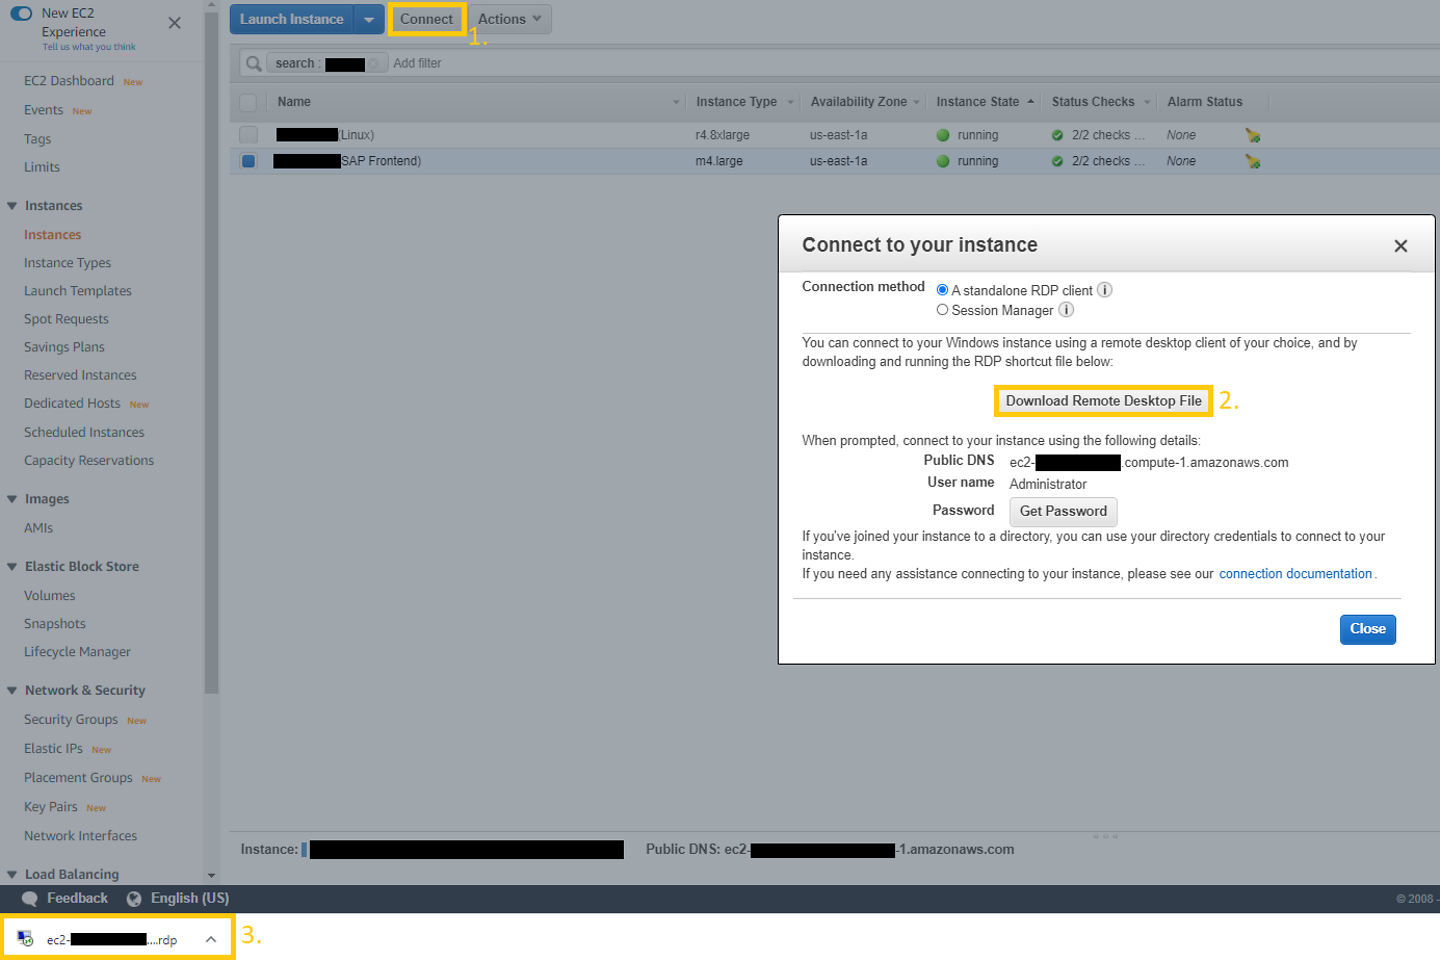
Abbildung 1: Verbinden mit dem SAP Frontend
What happened in part 1? With the help of SAP Cloud Appliance Library, the basis for our proof of concept has been deployed in the form of two EC2 instances. One for the SAP frontend with pre-installed SAP Logon on a Microsoft Windows R2 2012 Server and, the „heart” of this project, the SAP backend with SAP application server and SAP HANA in-memory database.
Before modifying the original setup, let’s have a look at what we got in our AWS account. As already mentioned, we have two instances with pre-configured security groups. We can access the Windows machine via Remote Desktop Protocol on port 3389 and SSH allows us to access the SAP backend on the default port 22. Let’s start the SAP frontend part. In the AWS EC2 Management Console, highlighting the instance and clicking on the Connect button will do the trick (see figure 1).
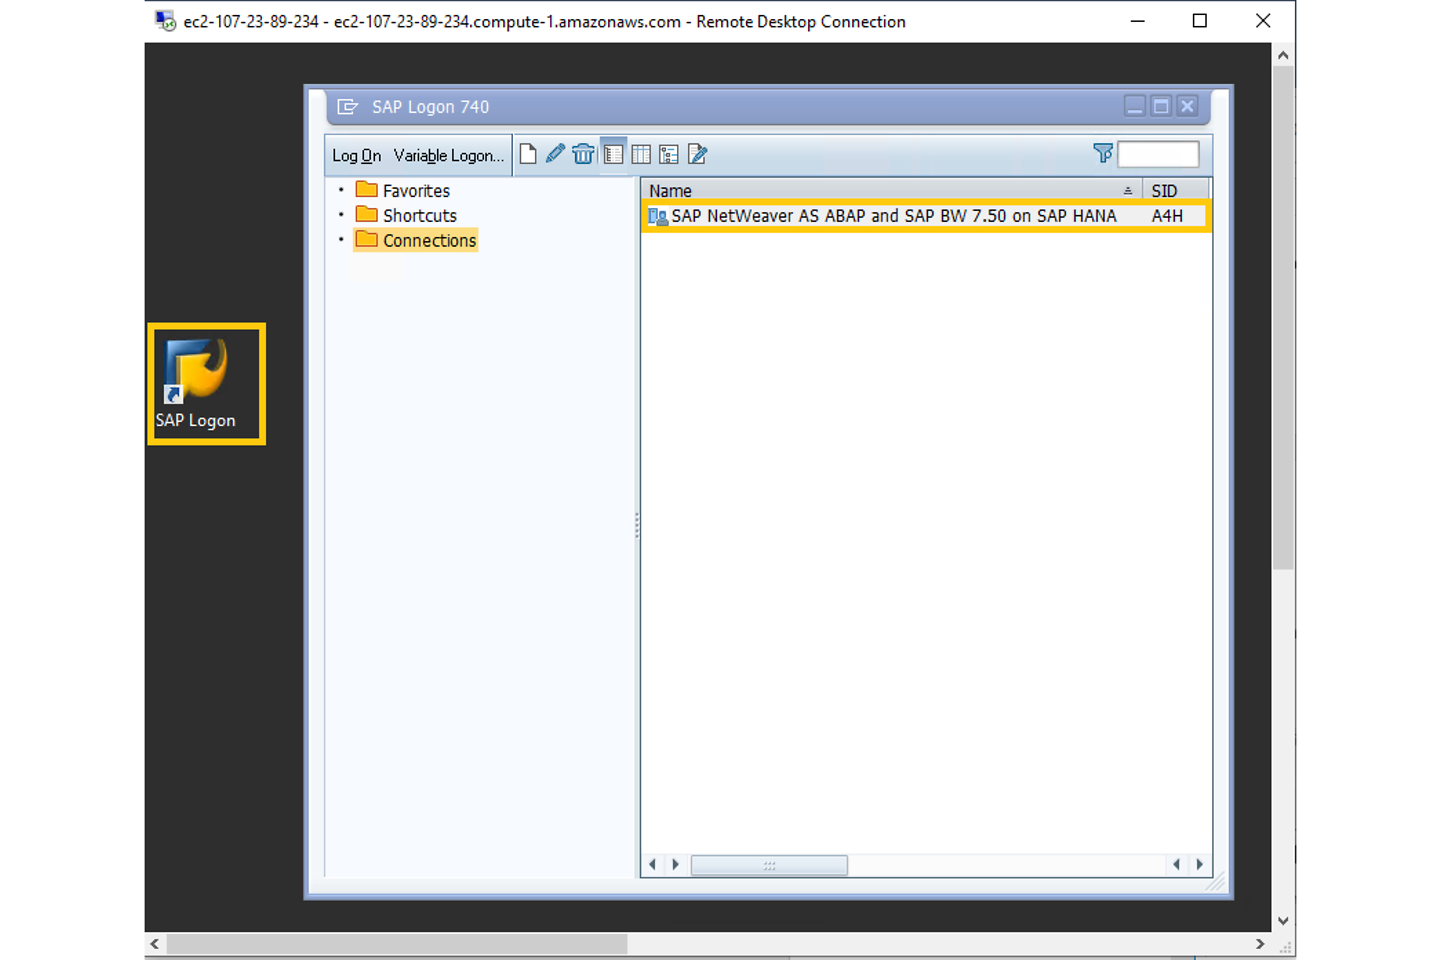
Abbildung 2: SAP Logon
By opening the file and entering the password for the user administrator which we set in the SAP Cloud Appliance Library, a new session will be opened. So, we are able to open SAP Logon (see figure 2). A4H is the System ID (SID) of our SAP NetWeaver installation. Double clicking on the entry, the logon screen for A4H will be shown. Let’s enter DEVELOPER as user and the same password used to logon to Windows instance (initially entered in SAP CAL console) – et voilà. Welcome to our own SAP universe!
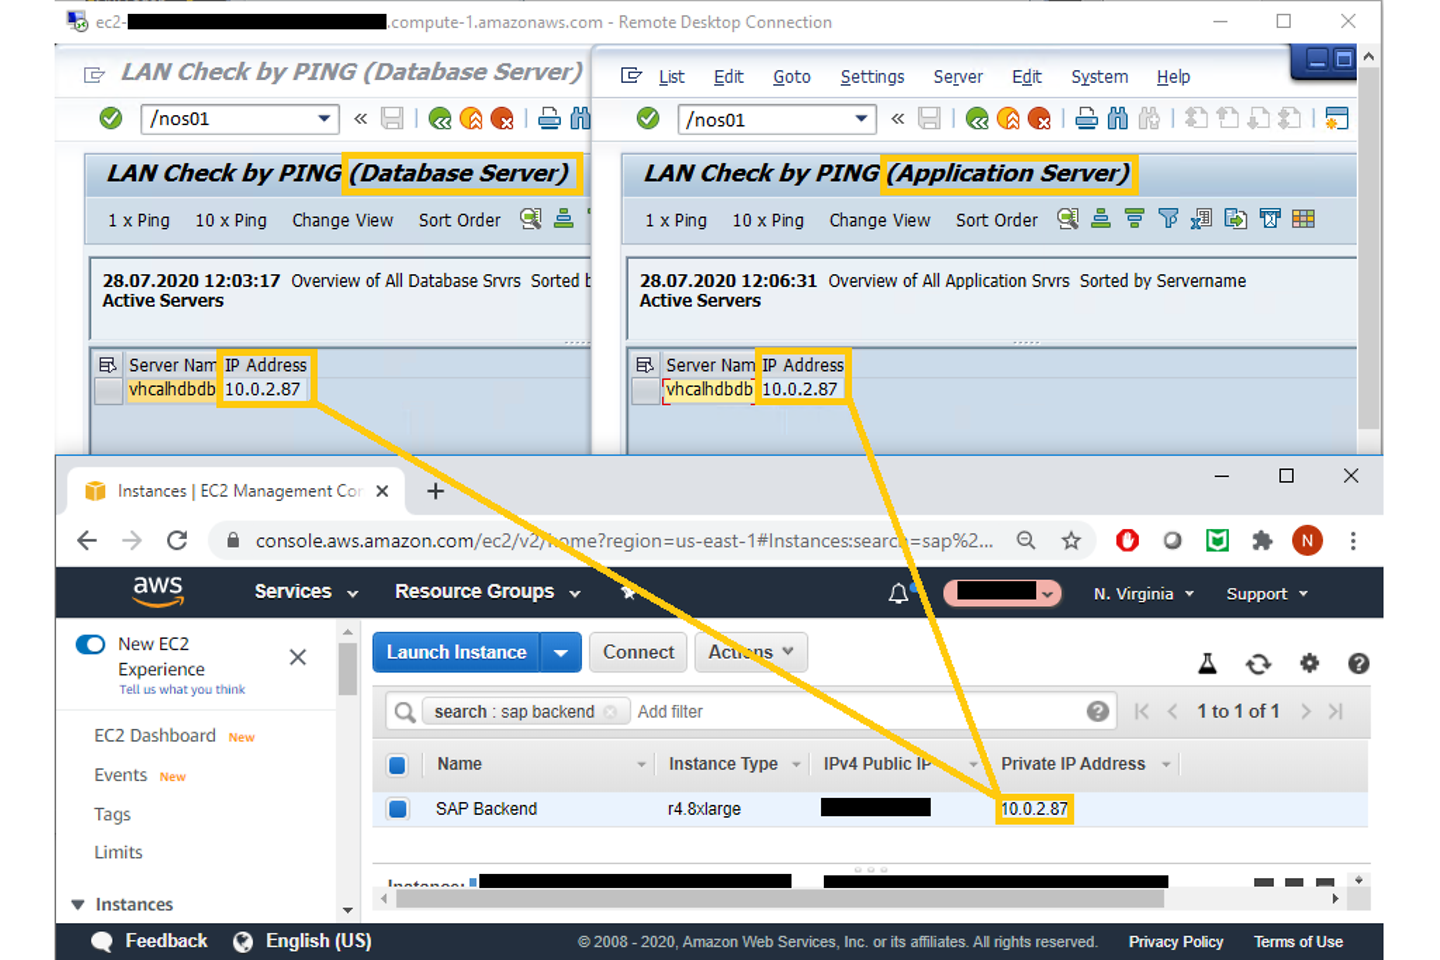
Abbildung 3: SAP Transaktion OS01
In SAP transaction OS01 (see figure 3), we can double check that no magic has happened yet. The SAP backend system comprises the application server and the batabase server. Later on, this transaction will be used to check which virtual machine we are logged on. That way we can verify whether the scaling solution and load balancing work and which SAP backend instance we are currently using.
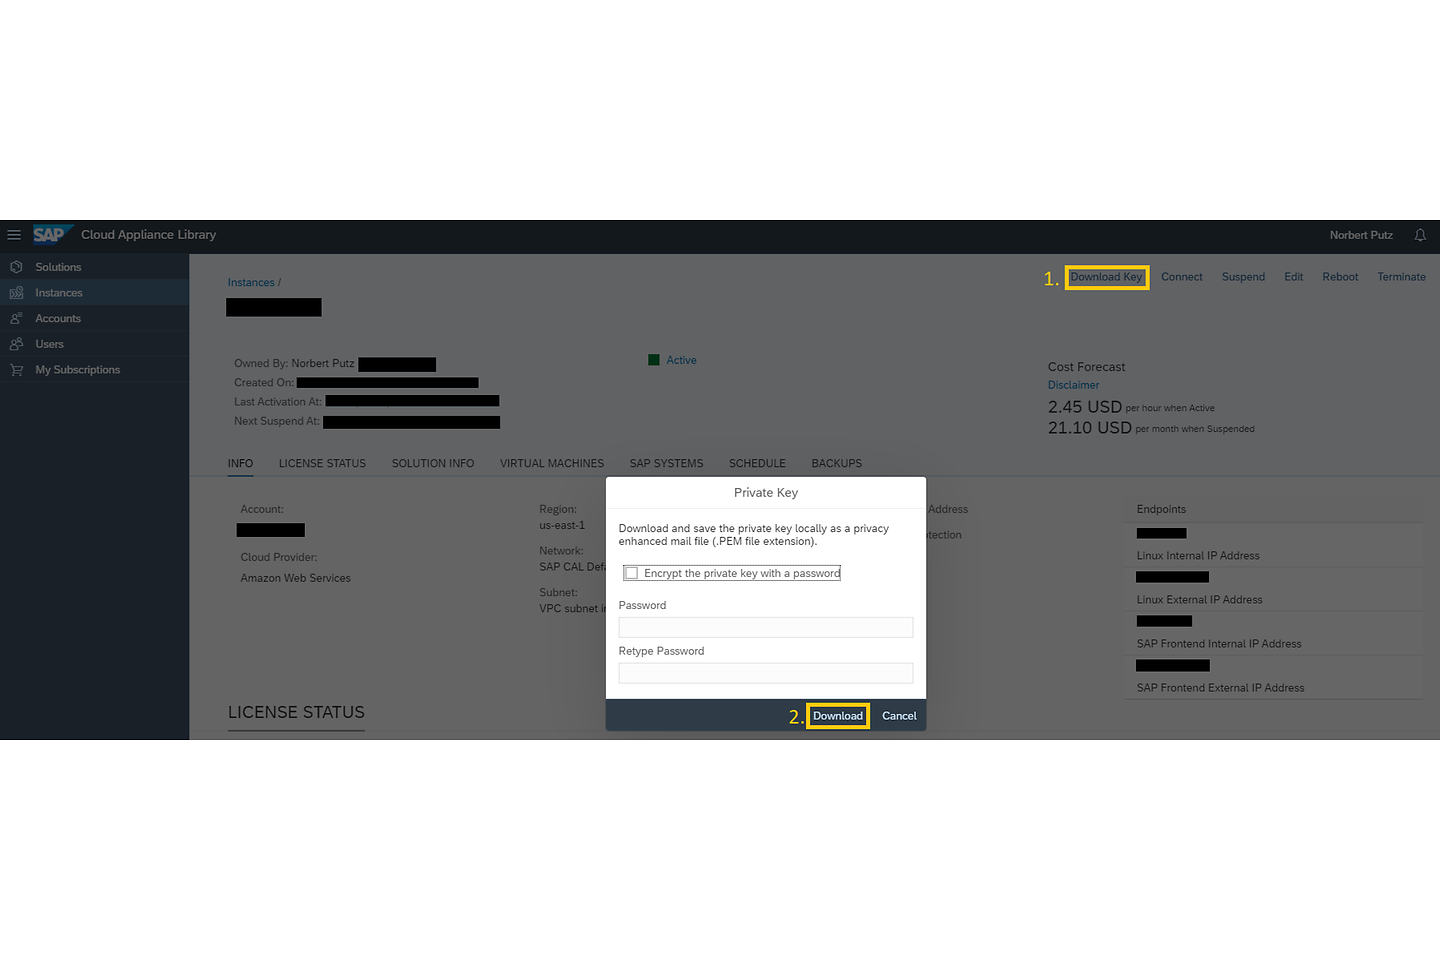
Abbildung 4: Herunterladen des Schlüssels in SAP CAL
At this stage, we can say the SAP landscape works as designed and the deployment is successful. Let’s see what we can do to make our landscape more advanced.
We have seen that the SAP backend works, however until this point, it was a „black box”. Let’s see what it contains, let’s access it via SSH. There are a lot of possibilities to log on to a Linux system. As I have a laptop with Windows 10, I will show you the easiest way, namely using the OpenSSH SSH Client via Command Prompt (CMD). For this, we will need the key (.pem). If you have not downloaded it yet, you can still do it in SAP CAL console as shown in figure 4:
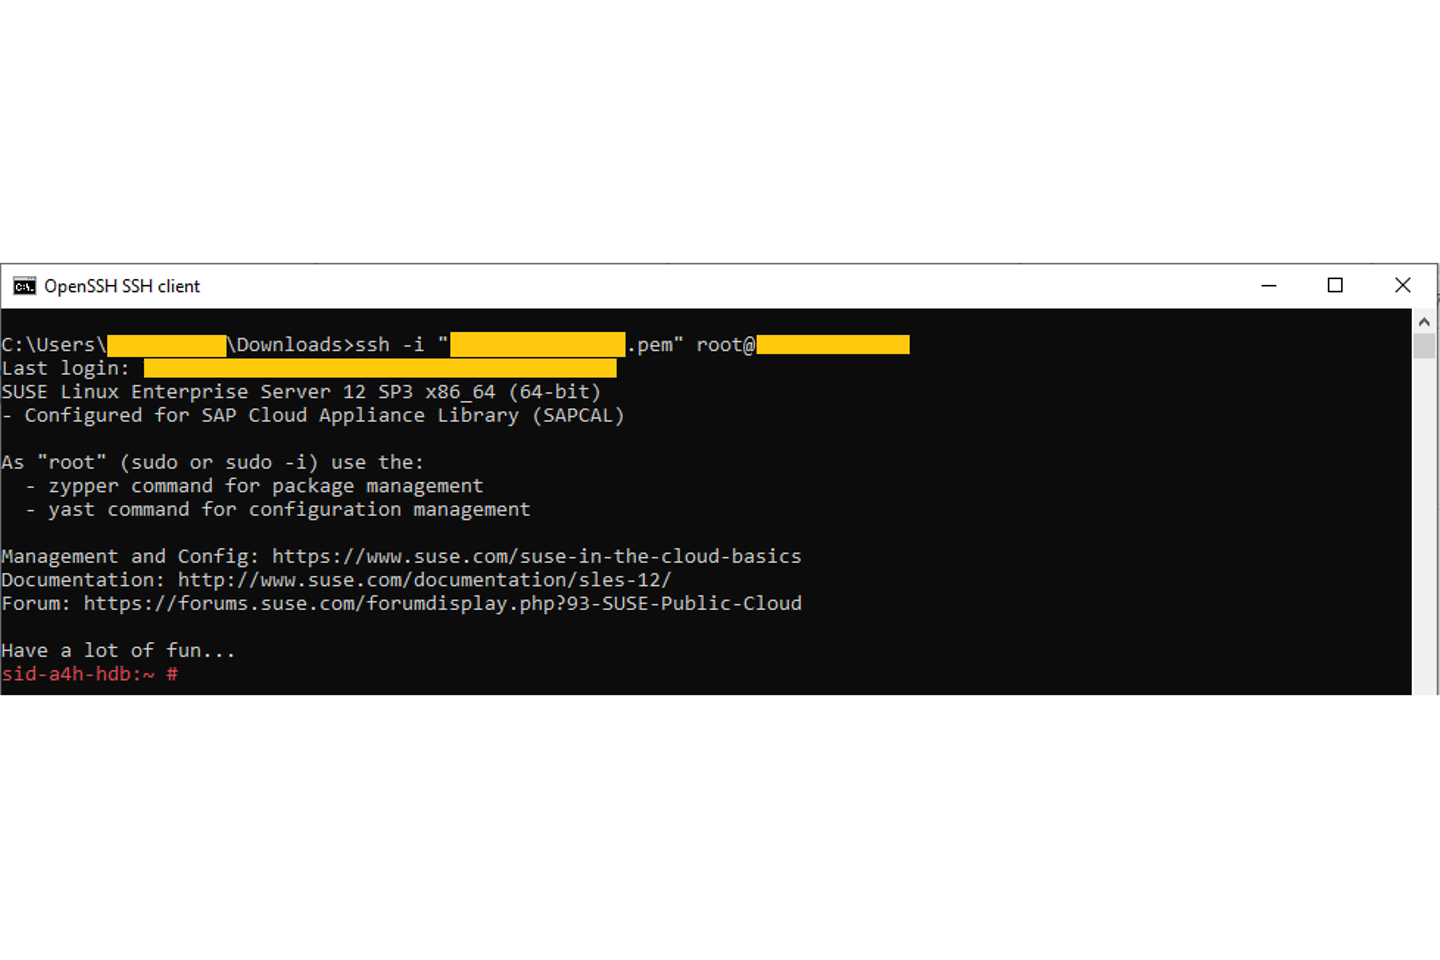
Abbildung 5: SSH-Zugriff auf das SAP Backend
Once you have it, open command prompt (CMD) and enter the ssh command in the form shown in figure 5. For more details on how to connect to a Linux instance in alternative ways, please refer to AWS Documentation or to SAP CAL’s Getting Started, section 2.5.
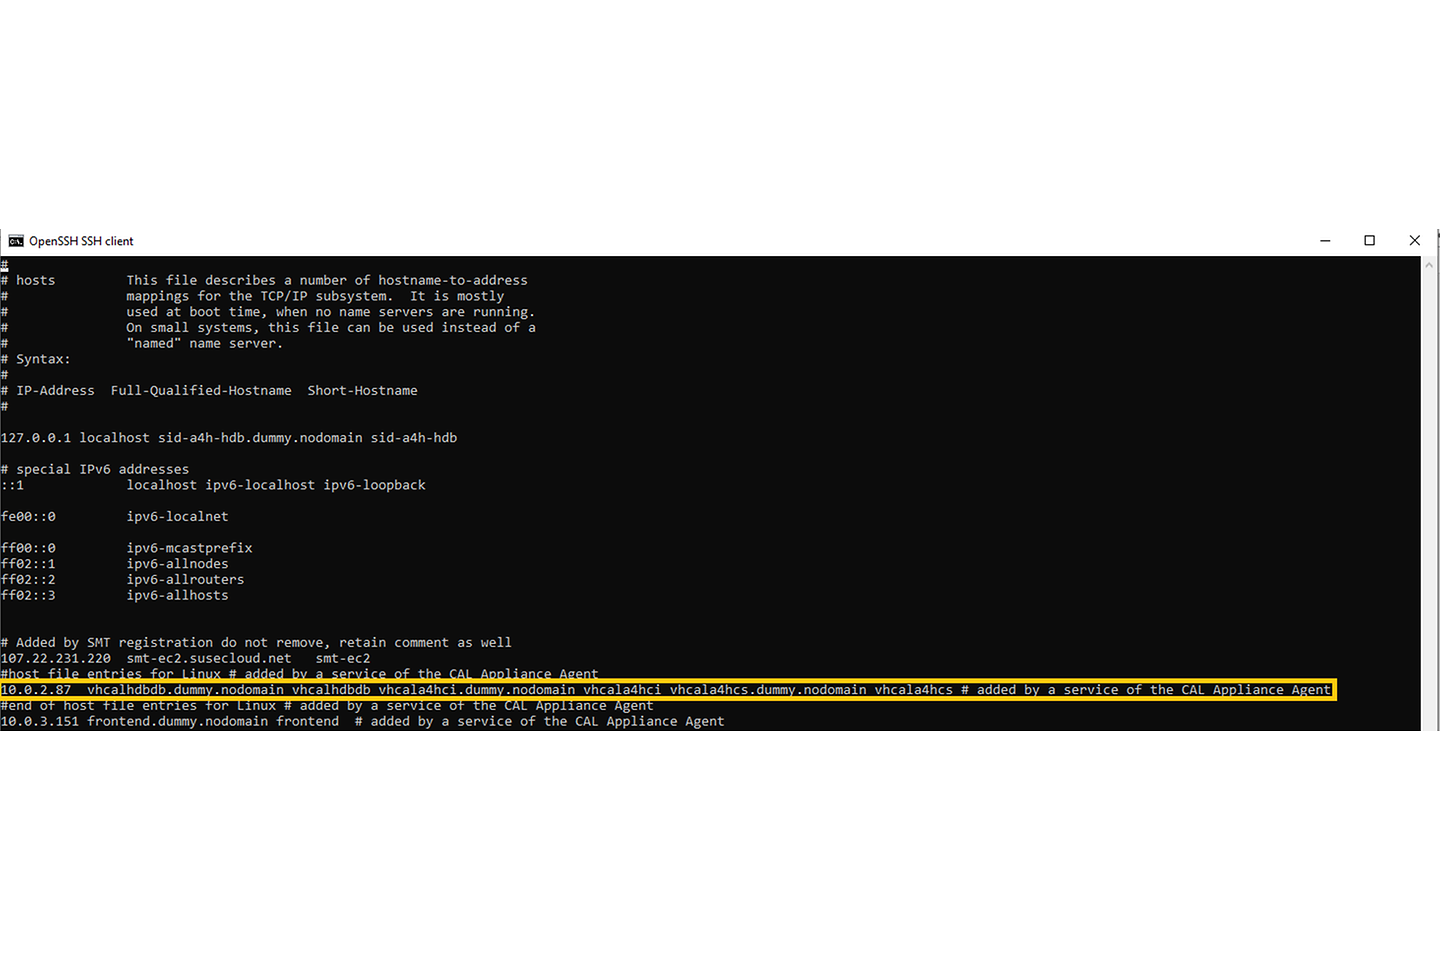
Abbildung 6: /etc/hosts file
As figure 6 shows in /etc/hosts file, which contains the hostname-to-address mappings for the TCP/IP subsystems, there are two entries for our SAP landscape. The yellow marked will cause troubles for us because it sets the hostname for the database, central instance and others. However, if we wish to scale, we cannot use the same private IP address on different instances. What shall we do?

Abbildung 7: Das Zauberskript
No worries, we can easily change that entry in the bootup phase to have the correct private IP address assigned to the hostnames. But how? Figure 7 shows the solution and I will describe all the commands in detail afterwards.
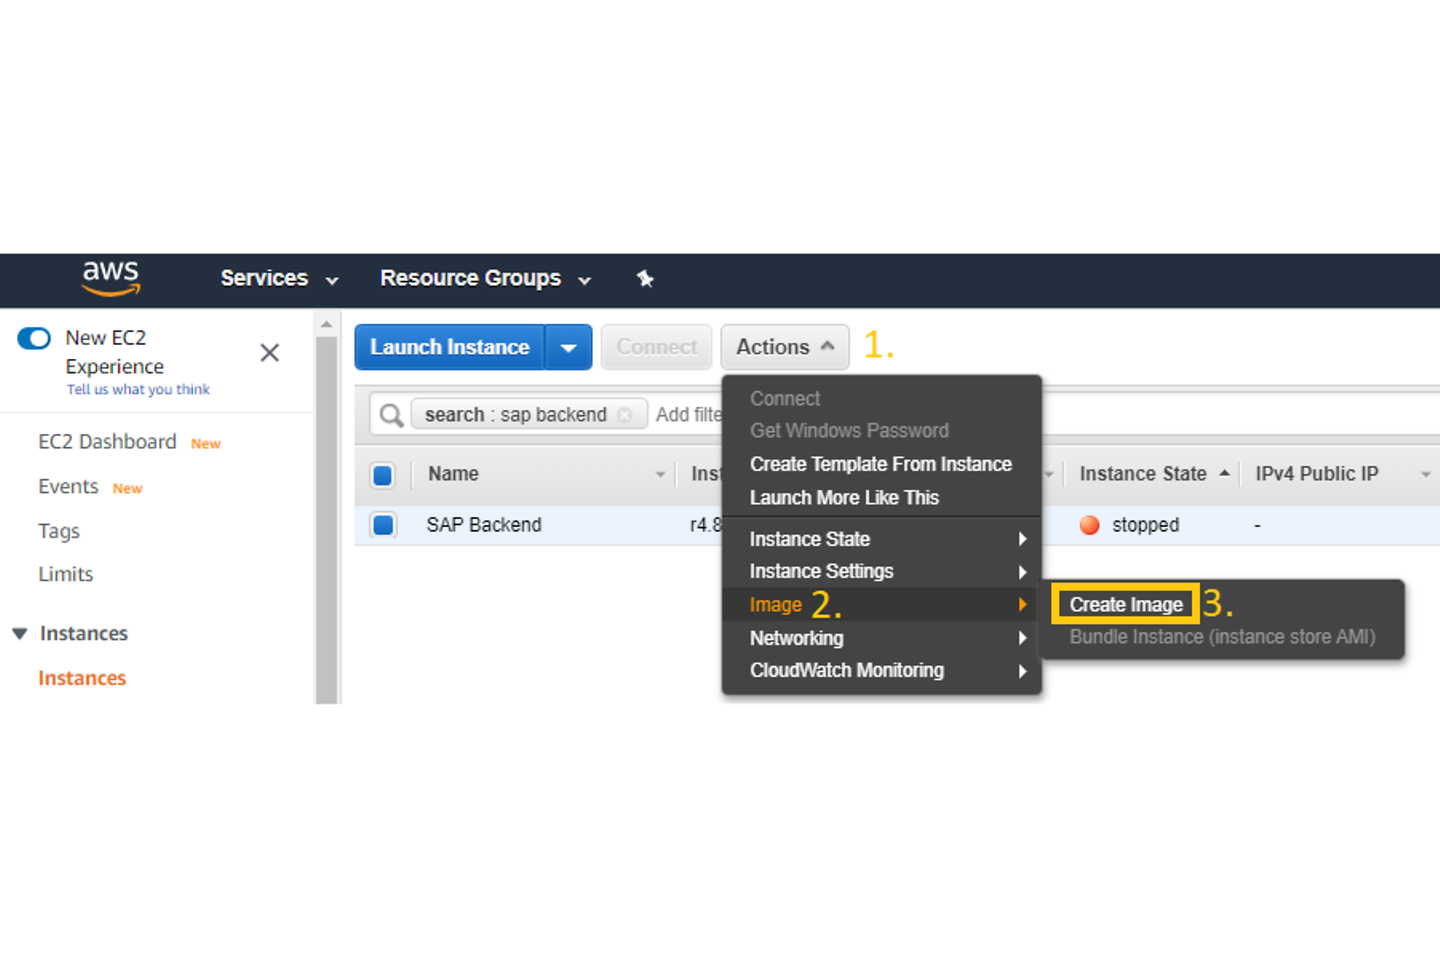
Abbildung 8: Image erzeugen
In line 11, we will get the private IP assigned to the virtual network interface eth0. In line 15, we will utilize sed (stream editor for filtering and transforming texts). The option -i specifies that the /etc/hosts file will be edited in-place. The „d” stands for delete and will delete any lines containing the expression „vhcalhdbdb”, which is the hostname. After that with a simple echo command (line 19), the private IP with the hostnames will be appended to /etc/hosts with the comment that it has been added by sap-up.sh.
As we carried out a big change and the SAP components should also “know” about it, we will first stop the SAP HANA database with the sapcontrol command, which is located in the /usr/sap/hostctrl/exe folder. After specifying the instance number (in our case 00) and executing it with the option -function Stop (line 23), the SAP HANA database will be stopped. As it is an important component of the SAP NetWeaver stack, it will be started the same way as it’ll be stopped, with the option -function Start (line 27). One thing, namely to stop/start the SAP NetWeaver stack, is left. This will be done as user a4hadm and with option -c “stopsap r3” (line 31) as well as with option -c “startsap r3” (line 35). We could use a crontab entry to execute this script at bootup, however we would like to focus on cloud-native solutions. AWS provides us with the possibility to run scripts at bootup as so called “user data”. In part 3, we will create a launch template and include this script into the user data.
With the mentioned steps, we are good to go to create our “golden” AMI, which will be used as a basis for our launch template for the auto scaling group.
AMI stands for Amazon Machine Image. It has several types like public, private, and owned by me. As we create our own, it will be shown under Owned by me. First, the SAP backend instance should be stopped. As figure 8 shows under Action/Image/Create Image, we can create an AMI.
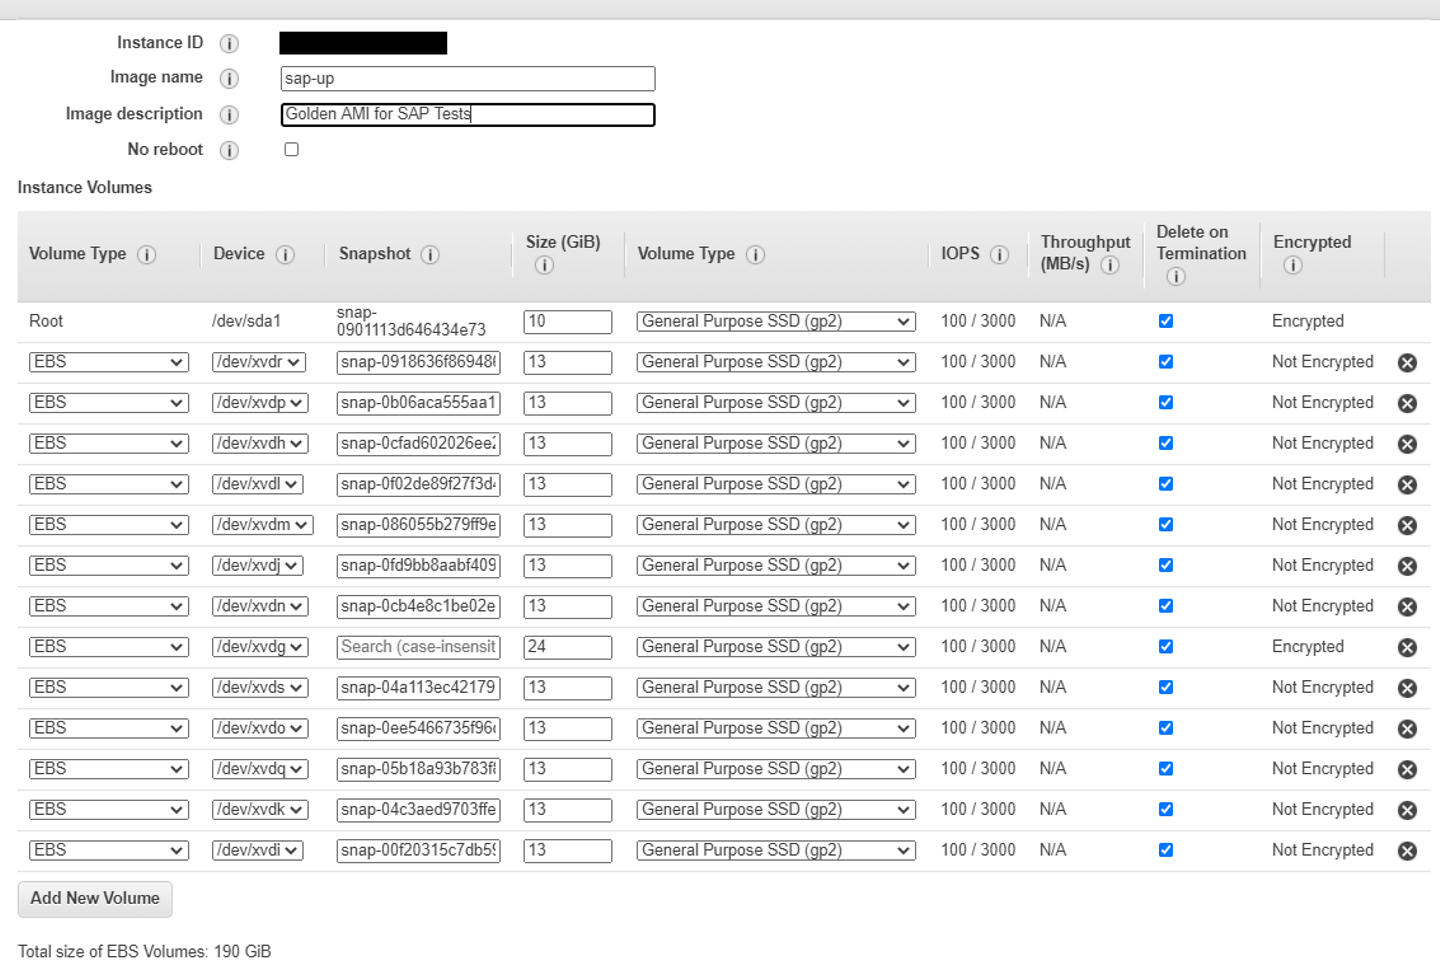
Abbildung 9: Name und Image-Beschreibung
In the following window, we should define a name of the image and a description as shown in figure 9.

In a couple of minutes, the AMI is in status available and is ready to use.
With this, we can close part 2 as we have prepared the SAP backend for some cloud magic with AWS native services. I hope you liked it and you remain curious about our final setup and working solution.
If you try out this proof of concept “live”, it is important that you take care of the costs. With SAP Cloud Appliance Library (CAL) you can suspend the landscape any time, if you don’t need it at the moment. In the SAP CAL console, by clicking on Suspend, both instances will be stopped (not terminated). With this, it is possible to save money, if the trial is not in use. Costs don’t go to zero – as you can see in the cost example above suspended instances will also lead to costs. If the landscape is not used for days, it is worth terminating it, so that even during suspend status costs are eliminated. The SAP solution can be deployed again at any time.
„And next week you’ll see ...” – just like in TV series, this concluding section is about to provide a short introduction about what will happen in part 3. In our third part we will focus on the auto scaling group and scaling policies. We will create a launch template based on the Golden AMI, which we have created here.
